How Do Embroidery Digitizing Services Handle Caps?
Caps are one of the most popular products for embroidered logos, names, sports designs, business branding, and promotional artwork. However, embroidering a cap is different from embroidering a flat shirt or jacket. The curved surface, limited design area, seams, fabric structure, and stitching direction all create special challenges. This is why professional Embroidery Digitizing Services use specific techniques when preparing artwork for caps.
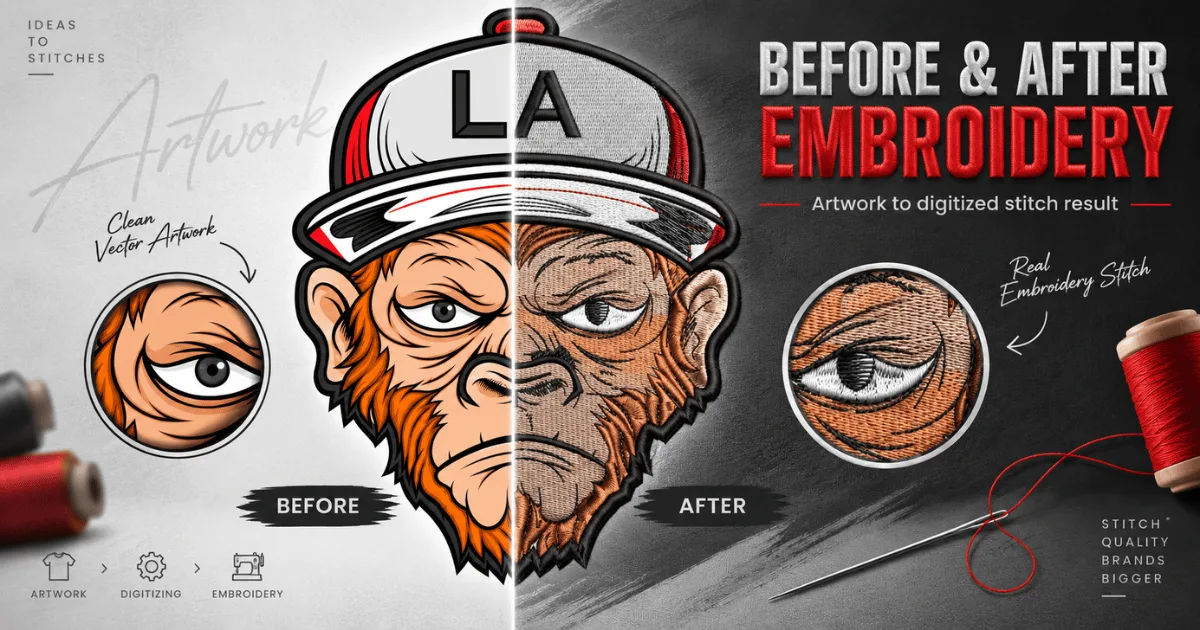
A design that looks perfect on a computer screen may not produce the same result when stitched onto a curved cap. Professional digitizers must adjust the artwork, stitch density, underlay, lettering, and stitch direction to suit the cap's construction. Proper digitizing helps the embroidery remain clean, balanced, durable, and visually attractive.
This comprehensive guide explains how professional digitizers prepare designs for caps, what challenges they face, which techniques they use, and how businesses can prepare artwork for successful cap embroidery.
Why Caps Require Special Embroidery Digitizing
Caps are not flat embroidery surfaces. Most caps have a curved front panel, and some designs must also cross seams or work around structured areas. This curvature changes how the fabric behaves while the embroidery machine is stitching.
When a needle penetrates a curved surface, the material can move differently from a flat garment. If the design is not properly prepared, stitches may shift, lettering can become distorted, and small details may disappear.
Professional Embroidery Digitizing Services account for these conditions before converting artwork into a machine-readable embroidery file.
The digitizer considers the cap's material, construction, design size, stitch direction, and intended placement. These details influence how the final embroidery will look.
Understanding the Cap Structure
Before digitizing a design, the digitizer needs to understand the type of cap being embroidered.
Structured Caps
Structured caps generally have a firm front panel supported by materials such as buckram. Their stable surface makes them relatively suitable for embroidery.
However, the curved front still requires careful planning. A design that is too wide or too detailed may not stitch properly across the curved area.
Unstructured Caps
Unstructured caps have a softer front panel and usually provide less support during embroidery. The fabric may move more easily under the needle.
For these caps, the digitizing approach may need lighter stitch densities and carefully designed underlay. Excessive stitching can cause puckering or make the front panel feel stiff.
Five-Panel Caps
Five-panel caps can create different embroidery conditions because of their panel construction. The center area may provide a clean location for a logo, but the seams need to be considered during digitizing.
Professional Embroidery Digitizing Services examine the available embroidery area and determine how the design should be positioned to avoid unnecessary problems around seams.
Preparing Artwork for Cap Embroidery
The original artwork is usually the starting point for the digitizing process. The digitizer reviews the image and determines which elements can realistically be reproduced with thread.
Not every part of a digital image should be transferred directly into embroidery.
Thin lines, tiny details, gradients, shadows, and extremely small text can create difficulties. The digitizer may simplify certain elements while keeping the main visual identity of the design intact.
Simplifying Small Details
A printed logo can contain extremely fine details because ink can reproduce very small shapes. Thread behaves differently.
A very thin line may become hidden by nearby stitches. Small gaps may close, and tiny shapes may lose their definition.
Therefore, Embroidery Digitizing Services often simplify artwork for better stitch reproduction. This does not mean changing the logo unnecessarily. Instead, the goal is to preserve its recognizable appearance in a medium with different physical limitations.
Choosing the Correct Design Size
Size is particularly important for caps because the front panel provides limited space.
A design that is too large can become distorted when placed over the curved surface. A design that is too small may lose important details.
The digitizer selects dimensions based on the cap style, available embroidery area, and design characteristics.
Managing Curved Cap Surfaces
One of the biggest challenges in cap embroidery is curvature.
When a design is placed on a flat screen, it appears symmetrical and evenly spaced. On a cap, the center is closer to the viewer while the sides curve away.
This affects how stitches are perceived.
Professional digitizers use specialized techniques to compensate for this curvature. They may adjust stitch angles, sequencing, and object shapes so the finished design appears balanced when viewed on the cap.
Centering the Design
The center of the cap is usually the most visible area. Digitizers pay close attention to the central alignment of logos and lettering.
Even a small positioning error can become noticeable because caps are commonly viewed from the front.
The design must also be positioned according to the cap's actual construction rather than simply centered within a rectangular artwork box.
Stitch Direction and Its Importance
Stitch direction has a major effect on the appearance of embroidered caps.
Different parts of a design may require different stitch angles. Changing the direction can add visual structure and help individual elements remain distinguishable.
For example, lettering may use one stitch direction while an adjoining shape uses another. This creates separation between objects without requiring excessive outlines.
Experienced Embroidery Digitizing Services plan stitch direction according to the shape and structure of every design element.
Using Underlay Stitches
Underlay is an important foundation beneath the visible embroidery.
It helps stabilize the fabric and provides support for the top stitches. On caps, this foundation can be particularly useful because the curved surface and cap material may move during stitching.
However, more underlay is not always better.
Too much underlay can create unnecessary bulk. It may also make the embroidery stiff or cause the finished design to look heavier than intended.
The digitizer selects an appropriate underlay based on fabric type, design size, and stitch requirements.
Why Underlay Helps Prevent Distortion
Without sufficient support, the fabric can shift as stitches are added. This can result in gaps, uneven edges, or distorted shapes.
Proper underlay provides a stable base and helps the top stitching maintain its intended form.
This is one reason experienced Embroidery Digitizing Services spend considerable time planning the foundation instead of focusing only on visible stitches.
Controlling Stitch Density
Stitch density refers to how closely stitches are placed within a particular area.
High-density embroidery contains more stitches in a small space. Although this can create strong coverage, excessive density can cause problems.
A cap with too many stitches may become stiff. The fabric can also experience unnecessary stress, and the design may develop puckering.
On the other hand, very low density can produce weak coverage and allow the cap material to show through.
Professional Embroidery Digitizing Services balance stitch density according to the material and visual requirements of the design.
Handling Lettering on Caps
Text is frequently embroidered on caps for businesses, teams, clubs, schools, events, and personal projects.
However, small lettering is one of the most difficult elements to reproduce clearly.
Selecting Appropriate Letter Sizes
Very small letters can become unreadable when stitched.
The digitizer may recommend increasing the text size, simplifying the font, or removing unnecessary details.
Bold and relatively simple fonts often work better for small embroidered text because their shapes remain recognizable after stitching.
Adjusting Letter Spacing
Thread can occupy more physical space than a digital outline suggests.
If letters are positioned too closely together, their stitches may overlap. This can make words difficult to read.
Digitizers therefore adjust spacing and sometimes modify individual letters to create cleaner results.
Managing Seams During Cap Embroidery
Cap seams are another important consideration.
A seam can create a physical change in thickness and stability. Running stitches directly across it may produce uneven results or place additional stress on the needle and thread.
When possible, digitizers plan designs to work around seams.
If a design must cross a seam, the stitch sequence and structure need to be carefully considered. The goal is to maintain consistent coverage while reducing potential distortion.
Professional Embroidery Digitizing Services take the cap's panel structure into account before finalizing the embroidery file.
Choosing the Right Stitch Types
Different stitch types are appropriate for different design elements.
Satin Stitches
Satin stitches are commonly used for borders, lettering, narrow shapes, and clean edges. They can create a smooth and slightly raised appearance.
However, very wide satin columns may require special planning because excessive stitch length can reduce stability.
Fill Stitches
Fill stitches cover larger areas. They can provide strong visual coverage for logos and broad shapes.
The digitizer controls their direction and density to prevent unnecessary bulk.
Running Stitches
Running stitches work well for fine outlines and details.
They are useful when the design needs narrow lines that would not be suitable for heavier stitch types.
The correct combination of stitch types can make a significant difference in the final appearance of a cap.
Sequencing the Embroidery
The order in which different parts of the design are stitched matters.
Poor sequencing can cause unnecessary movement, gaps, distortion, or registration problems.
Professional Embroidery Digitizing Services arrange the stitch sequence to support accurate registration and efficient production.
Generally, foundational elements are completed before the final surface details. Borders, lettering, and other finishing elements can then be placed accurately over the underlying sections.
Pull Compensation for Cap Designs
Embroidery stitches can pull fabric inward as they are formed. This is known as pull.
If the digitized design does not account for this movement, gaps can appear between embroidered elements.
Pull compensation slightly adjusts certain design areas so the final stitched result remains closer to the intended shape.
This is especially important for clean logos, lettering, and geometric artwork.
Experienced Embroidery Digitizing Services understand how different fabrics and stitch structures react to pull and adjust designs accordingly.
Choosing the Correct Cap Embroidery File
Once the design has been digitized, it must be saved in a format compatible with the embroidery machine.
Different machines support different file formats. Common formats include DST, PES, EXP, JEF, and others.
The correct format depends on the embroidery machine being used.
Businesses should tell their digitizer which machine or file format they require. Providing this information early can prevent compatibility problems during production.
Testing the Design Before Production
A professional digitized design should ideally be tested before a large production run.
A sample stitch-out allows the digitizer or embroiderer to evaluate the actual result.
The sample can reveal problems that are not obvious on a computer screen.
These may include uneven lettering, poor registration, excessive density, puckering, weak coverage, or incorrect positioning.
Making Adjustments After Testing
Testing is not necessarily the final stage.
If the sample shows a problem, the digitizer can modify stitch density, underlay, stitch direction, sequencing, sizing, or other settings.
The design can then be stitched again until the desired result is achieved.
This testing and adjustment process is one of the major advantages of working with experienced Embroidery Digitizing Services.
Common Problems With Poorly Digitized Cap Designs
Poor digitizing can create several visible and production-related problems.
Puckering
Puckering occurs when the fabric gathers around embroidered areas. Excessive density, inadequate stabilization, or improper digitizing can contribute to the problem.
Distorted Shapes
A logo may lose its original proportions when the design is not properly adapted to the cap's curved surface.
Unreadable Text
Small or overly complicated lettering can become difficult to recognize once stitched.
Thread Breaks
Incorrect stitch density, excessive stitch lengths, or poor sequencing can contribute to thread breaks.
Uneven Coverage
If the stitch structure is poorly planned, some areas may appear too heavy while others look thin.
Professional Embroidery Digitizing Services aim to identify and prevent these issues before full production begins.
How Material Affects Cap Digitizing
Not all caps are made from the same material.
Cotton, polyester, wool blends, denim, canvas, performance fabrics, and other materials can react differently to embroidery.
A soft fabric may require a different approach from a firm structured cap.
The digitizer should know what material will be used whenever possible. This allows the embroidery settings to be better matched to the physical surface.
How Businesses Can Prepare Artwork
Businesses can make the digitizing process easier by supplying high-quality artwork.
Vector files are often helpful because they provide clean shapes and edges. However, even a high-quality vector design may need modifications for embroidery.
It is also useful to provide the intended cap type, approximate design dimensions, thread colors, and embroidery location.
Clear instructions reduce the need for guesswork and help Embroidery Digitizing Services create a more suitable file.
Why Professional Digitizing Matters for Caps
Using professional digitizing can improve both appearance and production consistency.
A skilled digitizer understands that embroidery is not simply a process of tracing an image. The artwork must be translated into a sequence of stitches that behaves correctly on a physical material.
Caps make this especially important because of their limited space and curved structure.
Professional digitizing can help reduce production problems, improve design clarity, and create more consistent embroidery across multiple caps.
Tips for Getting Better Results
When ordering cap embroidery, start with artwork that clearly represents the intended logo or design.
Choose realistic dimensions and avoid unnecessary tiny details.
Tell the digitizer what type of cap you are using and which embroidery machine will produce the final product.
If possible, request a sample stitch-out before ordering a large quantity.
Also, consider how the design will look from normal viewing distance. A design that appears detailed on a computer monitor may not have the same visual impact when reduced to a small embroidered area.
The Role of Technology in Cap Digitizing
Modern embroidery software provides tools that make complex digitizing work more manageable.
Digitizers can create stitch paths, adjust densities, modify stitch angles, assign colors, add pull compensation, and control sequencing.
However, software alone does not guarantee a good result.
Human experience remains important because the digitizer needs to understand how the design will behave when stitched onto a real cap.
The best Embroidery Digitizing Services combine technology with practical knowledge of embroidery machines, fabrics, thread, and production methods.
Conclusion
Cap embroidery requires more than simply converting a logo into an embroidery file. The curved surface, limited embroidery area, seams, fabric type, lettering, stitch density, and stitch direction all influence the final result.
Professional Embroidery Digitizing Services carefully adapt artwork to these physical conditions. They simplify details when necessary, select suitable stitch types, establish appropriate underlay, control density, plan stitch sequencing, and compensate for the effects of fabric movement.
Testing also plays an important role. A sample stitch-out can reveal issues that may not appear in digital previews, giving the digitizer an opportunity to make improvements before mass production.
For businesses, sports teams, schools, organizations, and individuals, investing in properly digitized cap artwork can make the difference between embroidery that looks professional and embroidery that appears uneven or distorted.
The most successful cap designs are created when artwork, digitizing, materials, machine settings, and production methods work together. By understanding these factors and communicating clearly with Embroidery Digitizing Services, customers can achieve cleaner designs, sharper lettering, better fabric coverage, and more reliable production results.
Whether the goal is a simple embroidered logo or a detailed branded design, proper preparation is the foundation of quality cap embroidery. With the right digitizing approach, even a challenging curved cap surface can produce polished, durable, and attractive embroidery.
About The Author
